
I thought I’d show you how I do the hip joints since people commented on them. First of all though, I have to give credit. I learned this technique from a Judi Ward pattern. Judi Ward’s patterns are about the best way to learn dollmaking that I’ve come across. Her directions are clear, the pieces fit together, she invents techniques that are so useful, they become part of your design thinking. I would highly recommend her patterns as a learning tool, although she also teaches online classes, another excellent way to learn new skills. I think her babies are especially endearing. Here is a doll I made from her Emma Rose pattern. **Disclaimer- this is my way of doing this technique- it might not be exactly the way Judi described it originally, but how it works for me.
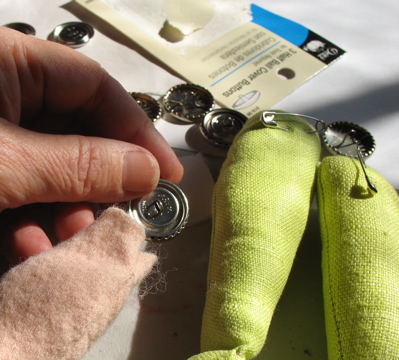
I’ve got the legs lined up, ready to finish. They are sewn and mostly stuffed with an opening at the top. The buttons used are the metal shank buttons – the kind you can cover with cloth, but not for this project. I buy them online from Joanns, because I can never find them locally when I need them. And, I like to have them on hand. You can use either the flat or domed style. I usually use 7/8 inch or 1 1/8 inch size.

-Snap the 2 parts of the button together- the top and the back. Slip the button into the opening at the top of the leg and safety pin into place. I don’t worry about the direction of the shank when I pin it- it can shift around a bit. The green legs on the right show the finished leg with the button sewed inside.
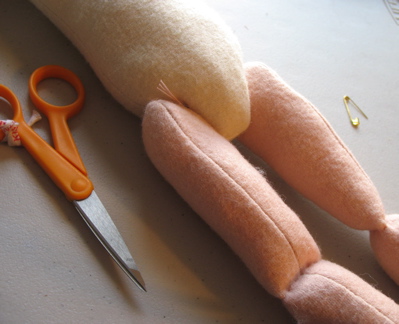
-finish stuffing around the button/hip area and sew shut. I use a ladder stitch to close the leg.

-I use nylon upholstery thread to make this hip joint- it is super strong and is available at my local sewing stores. I’ve switched doll legs here, because the thread shows up better on the green. Measure off a long piece of thread- at least 36″. Double it up (I cut it into 2 pieces at this point) and stitch through the shank of the button. Center the thread and then stitch around the shank one more time. Even up the 4 ends of the thread. I am using a doll needle here- it is about 3 inches long.
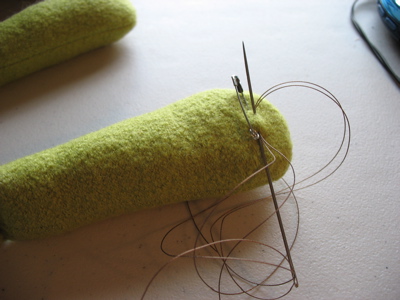
-Take the four ends and thread them through the eye of the needle-

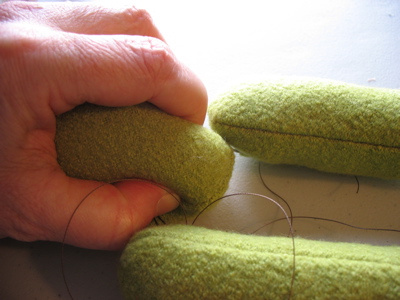
-Pull the 4 threads through the hip.

-Remove 2 of the 4 threads from the needle. Stitch through the shank. Unthread the needle and rethread with the other 2 ends. Sew through the shank going in the opposite direction. Hopefully the picture makes it clear.

Now this is the really hard part because I couldn’t take a photo! Pull the threads tight. This is one of the reasons you wanted a long piece to start with- you might want to wrap the thread around your hand for leverage. When you think it is tight enough, wrap one side of thread around the joint once or twice and then tie a solid knot. Clip off the excess thread, leaving about an inch. I usually just leave it like that, although I suppose you could sew it back into the body where the thread came out at the hip.
If you get it right, and it is usually a matter of getting the thread tied tight enough, your doll should be able to sit up, very nicely, all by itself. It takes me 2 tries about half the time.

In case you can’t figure out what the heck I’m trying to say, I found another description of this technique here.
Thanks, Mimi. It was very easy to understand.
when i decided i wanted to make dolls i didn’t know where to learn so got on the computer and found an online class by judi ward. it was there i learned the beauty of using freezer paper for patterns and although i didn’t make all the dolls in the class i learned tons about technique and tools… very, very much worth it. i am going to have to try this too… thanks for the lesson.
brilliant tute! well done, and thank for sharing this kind of info. I am a little wary about sharing too much about how I put my resins together. Good on you.
Oh, I love this! Thanks for sharing the tutorial, I am definitely going to try this one!
oh this is great! I sometimes use buttons too for movable arms and legs, but than you can see this button on the outside, which is not always safe for children..This is the technique I was looking for! Thanx!!
Btw, I love the naked shoulders of your dolls! they are really so beautiful, your dolls!!
I too learnt this technique from Judi. Her techniques are wonderful for someone who is just starting out in dollmaking and as you say they are so workable.
Thanks for sharing this. Great tutorial!
Thanks Mimi for the tutorial! I’ve never made one of Judi Ward’s dolls before. I’ve admired them but never got around to buying one of her patterns. I may have to do that now to get some new techniques that you’ve mentioned.
Thank you for sharing this. I read a similar tutorial on this month’s SAD, but I did not quite get the point till I read this post. Thanks!
Hi Everyone:
Thank You Mimi for the great explanation of my invisible Jointing method. It is such a great method for jointing and safe for children.
Safety for children was what made me invent it in the first place. I had a doll and craft shop in Idaho, and a customer came in and was exclaiming over the dolls, but would not buy on because the covered buttons were on the outside of the limbs. (I covered them with the dolls skin fabric so they didn’t show much)
She said they were dangerous…soooo….a bit of serious thinking transpired, inside they went, and WOW! What a better way to do it, unless the buttons are for decoration of course.
Mimi, your Emma Rose bears no resemblance to the “real” Emma Rose….WOW! what an adaptation! A combination of a Vintage style with contemporary. Love It!
I hope all who try the inside jointing will persevere through the part whaere you are pulling the joints tight….That is the hardest part as Mimi says. I have done it for so many years (1975 or 76) that don’t even think about it,,,,but here is a hint…Pull, press the dolls body with the thumb on your right hand without letting up at all on the pulling. Then with the cords in the left hand do the quick wrapping between the body and limb, …Then tie…
It is the Pressing down on the body that makes it a one person job. BUT…If you have a second person, they can press the joint area down after you pull, for the same result.
Dolly Hugs, Judi
Very beautiful and understandable tutorial! Where do you get the felt for your dolls? Is it wool? Thank you for sharing.
This is AMAZING! Thanks so much for sharing the process in such a detailed, easy-to-follow way… you may not want to write books or teach (which is fine), but if you ever did want to do it, you’d be fabulous at it!
This is AMAZING! Thanks so much for sharing the process in such a detailed, easy-to-follow way… you may not want to write books or teach (which is fine), but if you ever did want to do it, you’d be fabulous at it!
Thanks for sharing
Your photography here is superb – thanks for sharing your process. Your doll designs are wonderful!
Delurking here to thank you for sharing this tutorial. I’ve never made dolls, but find them fascinating and might want to actually try making some someday soon. This excellent explanation has now piqued my curiousity even more.
Some time ago, you were looking for map fabric. I have a lot of yardage of a “round the world” type of print that is in light ocean blues, sand, and medium to light greens. If you are interested, please feel free to email me and I’ll send you some pictures of it.
bpier12ATaolDOTcom
Pingback: Tantehilde.be » Meet the sunshine girls
I am having to design my own pattern as my kids want unusual animals and was looking for a way to make the legs movable. I hope this works. Thanks!!
Hi All:
So glad to see more “happy jointers” with Mimi’s great tutorial! Thank You again Mimi for doing the tutorial and having it available for all. Cloth Dollmaking is my passion and “figuring out” new and easy ways to do stuff, or new shapes to achieve something are my driving force.
I usually won’t even start a new pattern unless it has something new to offer.
Dolly Hugs, Judi
I love to read doll making information & always plan to use it some time so I save it.
Many years ago I made Judi’s Shirley Temple doll. I think she turned out lovely.I took one of Judi Ward’s on-line classes but haven’t finished my doll yet. However, the instructions with pictures are great so I’m looking forward to finishing my Bleuette next winter. We are moving from a large house into a smaller one so my time is spent with downsizing & taking my share of responsibility for an aging parent.
Love to all doll makers,
Linda
Thank-you for the instructions and pictures. They were great! I always wandered how it was done.
Thanks
Pingback: Meet Molly « The little house by the sea
Thank you so much for this tutorial! Though I’m not entirely sure I understand the point of all the different threads? Is it to make it more secure?
Thanks Mimi! Well done!
Bobbie
Thankyou so much! I’ve been struggling to understand other tutorials explaining this method, but this is so simple, I love it. I can put some limbs on my dolls now :)
this tutorial has proved invaluable! thank you.
I just wanted to let you know that I have dived back into blogging and that I have created a bear making tutorial and free original pattern on my new-ish blog. I have linked to your blog and this tutorial specifically for the joints. if this is a problem in any way, let me know and I will remove it.
http://zippypops.tumblr.com/post/184082022/tutorial-free-teddy-bear-pattern
thanks again!
your dolls are truly beautiful creations.
Pingback: Hello world! « Felted Jumper Arms
Pingback: Be-flowered Fairies and Babies in Progress
Pingback: Doll Joints « Felted Jumper Arms
Pingback: Meet Mimi | Colorful Creative Ideas
Pingback: Mimi Kirchner Dolls | Colorful Joyful Day
Pingback: Mimi Kirchner Dolls | Colorful Joyful Day