I want to grow tomatoes this year. I want to have a LOT of tomatoes instead of a few very precious and expensive ones from the farmers market. Unfortunately I live in an old house with toxic soil around it- not unusual in New England urban and suburban areas. The soil has years of lead paint scrapings, car fumes (more lead) and who knows what. It is not soil anyone would want to grow edibles in. The solution is raised beds or containers. I am going to try to write a tutorial about how I planted my tomatoes based on the excellent suggestions of Bella Dia.
I think I’ve mentioned before that I have a house full of stuff. That makes me reluctant to go out and buy more stuff- like containers to grow tomatoes in. Here is how I made my own, hopefully biodegradable, containers and got my tomatoes started.
material list-
an old cotton T-shirt, size X-Large
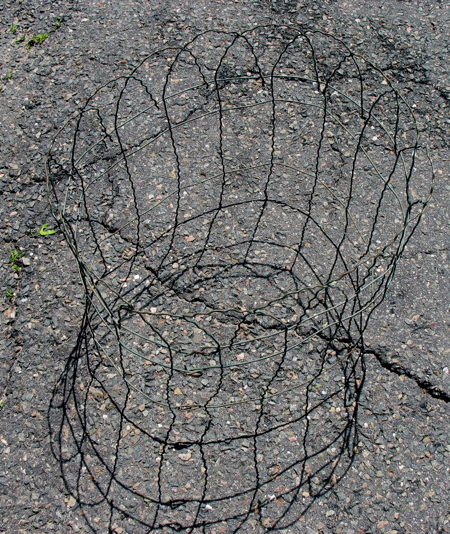
some garden fencing that was stuck up in the rafters of the garage, already starting on the biodegrading part- ie rusty.
compost from my compost pile
commercial potting soil
tomato plant
Step 1: Cut the label out of the shirt since it is probably not cotton and wouldn’t decompose.
Step 2: Make a circle shape out of the wire fencing. Mine is about 16 inches across.
Step 3: Place in the garden and push the wire prongs into the soil.
Step 4: Put the t-shirt into the circle, collar edge down. Stretch the bottom edge of the shirt around the top of the fencing. I didn’t worry about weeds underneath- whatever was there will be dead soon.
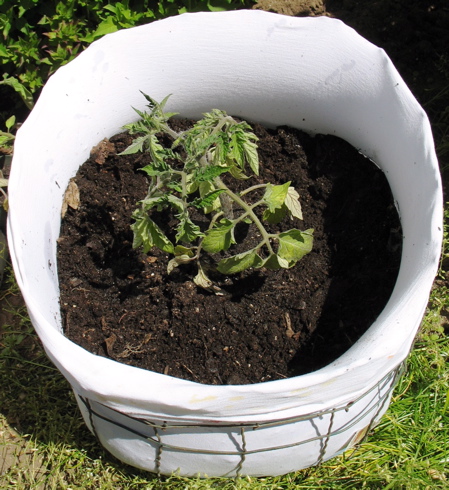
Now there is a “pot”!
Step 5: Fill it half way with compost or other clean filler dirt, like all last years window boxes that you are replanting. I used compost from my compost pile. Push and stretch out the sides of the t-shirt as you add dirt.
Step 6: Center the tomato plant on top of the compost. Loosen up the root ball.
Step 7: Use the commercial potting soil to fill in around the plant and up to an inch or so from the top. Yes, you are burying 6 inches of stem and leaves. Trust me, that is a good thing. Water thoroughly.
Step 8: Wait 2 months. Hopefully, tomatoes!
I’ve got 4 done. One more to go.


wow mimi, wonderful! i think i need some tomatoes too.
Mimi, I love your idea, and I’m no gardener. I’d be curious to hear your impressions at the end of the season, like how did shirt withstand the watering and weather. It really is an awesome project.
xo, Vesna.
This is very neat! Kudos to you for being so crafty and resourceful!
That is totally brilliant. I would go out and do it today, but it is POURING, which at least means your plants are getting a thorough soaking. Hope not too much of a good thing.
I love this use for old T-shirts, and the idea of getting a planter for nothing but elbow grease.
How ingenious!
no way! i’ve never heard of this!! i can see that i’m going to need many, many of these. how resourceful of you too!! thanks!
We did it. Five tee-shirt tomatoes planted. They survived their first night in tee-shirts. The planters are contra-yuppie and look like upside down mushrooms.
Mim L.
Well, that’s totally genius. What a great use for old T-shirts. And I’d never heard that about burying the lower stem and leaves. Huh!
That is the most fantastic thing! I really want to try this! I have no yard to speak of (city apartment), and this would really save me some money on containers. Great!
Pingback: Doll » Blog Archive » garden update
Super Idea!! I love it. FYI–I am in the seed biz and have seen the food shortages beginning. That is why I am beginning to save non hybrid vegetable seeds.
No family should be without an emergency survival garden plan. It is easy, affordable and will put your mind at ease. Remember to only use non modified (gmo)untreated (for chemicals) seeds. And MOST IMPORTANT, and I cant stress this fact enough!! your garden seeds MUST not be a HYBRYD. The dna has been altered with a terminator gene that essentally makes the seed sterile after its first use and therefore cant be used to produce viable seeds for the following years. This is important if we run into a food shortage in the next year or two. You should start growing and saving seeds NOW. If you dont need them in the future you are only out $50 and you have eaten well all year.
We sell a full garden of seeds at backyard heirloom seeds and herbs. Also canning varieties, herbs and medicinal herbs. Think ahead and prepare. It cant hurt.
Pingback: Doll » Blog Archive » other goings on
What a brill idea. DH has many old t shirts but I don’t think he would give up a mac one LOL
Our weather is comming into the rainny season here in Mexico City….but I am going to do those tomatoes….tomates or jitomates….we call jitomates the red one…and the small green ones tomates…
Maria
Brilliant – I love the look of the planters. How fast did the t shirts start disintegrating? Like did they last the summer?
What a great idea. Kelley is right about not using commercially modified seeds. We have a group called the Diggers Club which sells either organic or heirloom varieties of seeds to keep the plant diversity going that we need. Seed saving is very big among the gardeners in Australia.
Outstanding Mimi. I love it. The rest of your herbs look very happy too. Your green thumb is evident.
Organic all the way!!
Audrey
This is a brilliant tutorial!
I am a fellow Etsy seller and a Passionate Gardener! Unfortunately, due to pressures at home and in our businesses, I am lagging in zeal for my blog. Might I be able to possibly use your post for my blog?
I would be so honored if you might let me reprint it with your permission and links back to your shops, etc.
Thank you for your consideration!
Kelly Ann Taylor
Sure, go for it! Thanks. I did this for 2 years now and have had excellent yields. And yes, the t-shirts rot but the root balls are usually firmly established by then and it hasn’t been a problem.
How unique. What a great idea. I want to try it. Thanks
Such a cute idea. I’m going to make one!
I have been struggling with the idea of planting a garden. We’ve tried it 4 or 5 times and always failed because we live in “clay country”. I will try this method this year!! Thanks so much for sharing!!
A great material is burlap, which you can buy from most greenhouses and garden centers by the foot. Wrap it vertically in sections around wire garden fencing and you have a very durable container with lots of airflow for the feeder roots.
I’ve also used thin coco liner with success. It’s usually available by the foot as well (seasonal item). It looks nicer than burlap but costs a good deal more.
Pingback: Doll » Blog Archive » what happened to June?!