
I mentioned at the end of the last post that I was starting to work on my pieces for the printed fabric swap over at Bitter Betty Blogs. I signed up because I have been wanting to try it forever and this is the push I need.
I decided to go with stamping as opposed to silk screen or something. I wanted to try it with the least possible capital outlay and the fewest new skills to learn. I was already feeling totally over my head and have had a very hard time finding any information. The first confusion was over the Speedball Speedy-Cut block- pink or white? What is the difference? The people in my local art store couldn’t enlighten me. Later I found this on Alma Stoller site, so now I know. I ended up buying the white because it cost less and I had no idea what else to base the choice on! Carving was easy and fun! I was having so much fun with the carving part, I was very reluctant to transition to the next step…
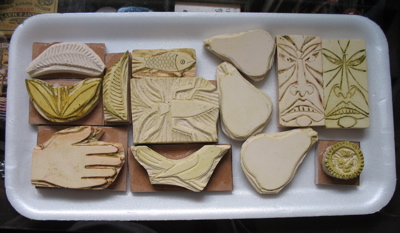
printing. I REALLY didn’t want to go out and buy printing inks- I know, I’m cheap. But I have so many types of color mediums already- I just couldn’t imagine bringing something new into the house. I was thinking about oil paints, oil bars, acrylic paints, to start the list. I found this article and it helped me settle on acrylic paints. This is another page of useful links and information. I wanted something that would be washable and have a good feel, not stiff- I want to be able to actually use this fabric!
The first step was to try out my stamps on paper. I used inexpensive craft type acrylic paint- the kind that comes in the little bottles. I sponged the paint onto my stamps using pieces of make-up sponges- those things are a great art tool! Here’s what I got-

The brown stamp on white was my first attempt on fabric.
Based on the various bits of information I could find, this is what I have figured out so far.
-Acrylic paints work very well, but don’t try using a brayer or a brush of any kind- I couldn’t manage anything that wasn’t very streaky. Daubing the paint onto the stamp works very well- I used the make-up sponges and also some wads of felt.
-adding drying retardant was helpful both in slowing the drying and also making the paint a bit gummier.
-one article suggested dampening the fabric first. I had no better results when I tried that. Actually I had some color bleeding so I’d say forget that idea.
-after I finished printing/stamping, I let the fabric dry for a bit (1/2 hour?). Then I ironed the fabric on both sides with steam on a cotton setting. I have no idea if this was necessary. I then threw them all into the washer at a regular warm wash. I noticed no change in the color at all, after the wash. Yeah!
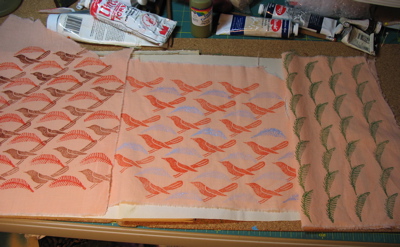
Here are my test pieces after washing-

detail-


Now I have to think about doing my bigger pieces- yikes! This is actually a lot harder then I ever thought. I am nervous about the 1/2 yard pieces with no major screw-ups. Also, choosing the colors turns out to be a lot harder then I thought it would be. I will be coming out of this project with a new respect for fabric designers!
Wow, I am impressed with your skills as a fabric designer. Those are beautiful, and very organic looking.
Those are really cool. I like the hand ones best… they made me want to make something out of them! love.
I love them all! But especially the sunflower. Very nice work.
how cool, those look great!
Hi I’m tagging you. Participate if you’d like.
http://penguinandfish.blogspot.com/2007/07/tagged-by-fifi.html
Eeeeeee!! Looks like you have a new business to me! Those are so wonderful! I’ve never tried this before but when I do I’ll come back and review your tips – thanks in advance for those :) I’ll be looking forward to seeing the finished quarters!
I’ve wanted to do stamps for a long time, too, Mimi. These are lovely!
those are really great! i love the bird pattern. i’ve been wondering about how to try this, thanks for the links. keep going!
These are wonderful! I do a lot of fabric painting and sometimes include stamped images on my fabrics. I’ve never tried carving them myself and your work here has inspired me to finally try it. Love the sunflowers!
So pretty!
I really enjoyed reading your post today. I love to view ‘the process’ as well as the finished product. I think your completed textiles are great. But, the work involved is enormous. One of my daughters made the most fascinating drawing of a swirly heart with markers when she was young. I silk screened it with red on pink fabric and made heart-shaped pillows with a red/white polka dot ruffle around the edge. I made enough for her to give to her friends for Valentines Day. I’m getting lazy in my old age. However… got a new sewing machine yesterday and am about to start reading the direction. Hmm… what will I make first??
Joni
Wow, Mimi. I’m loving them. Now I have to get my act together and get something made. Thanks for the info.
Love all designs, but the birds are my No.1. Also – your carved stamps – shear genius.
xo, Vesna
I really love your stamps, they are so neat and professional! I liked the brown on paper tryouts best for some reason. You’ll find that acrylic does not go when you wash it – it was first invented to be used as an outdoor paint! like using acrylics on cotton but it tends to stiffen the fabric.
They are all great! I REALLY hope I get one. I’ve been carving stamps for years, and didn’t even know they made pink blocks. One of my local art stores sells 18″x24″ sheets of the white stuff. I just get one of those every year or so.
I agree, the fabrics are looking really good, I love the imagery you’ve chosen!! Thanks for telling us about your process & what works / doesn’t work.
The stamps look great and now I want to try some that I got in India. But like you I will try them on paper first.
I love them all. I have been wanting to try this myself. Maybe one day. I’ll be following your progress for inspiration for sure. Great job!
Sheree
Pingback: Doll » Blog Archive » fabric stamping
I was here before but didn’t have time to comment! YIPPEE!!! FUN FUN FUN!!!
MiMi! I love those little flowers with faces! Your stamps are divine! I am working on my fabric too- I am doing some rubbing’s and then some stamping and stenciling! It’s more difficult when you are giving it away- I keep worrying if it’s good enough?! It’s supposed to be fun, right?
I love your prints! So beautiful. I need to get around to mine.
Pingback: Happy Labor Day Y’all! « Elizabeth, You Were Born to Play That Part
Just a note to say that the use of a fabric fixative that can be heat set (you may have to read the fine print instructions) should be included because I have found that acrylic paint alone can wash out over a few washes. Also, I use plastic bags like the ones that your subscription magazines are wrapped in (recycle, reuse, reduce) as an ‘ink pad’. Place the opened bag on quite a few sheets of newspaper, mix the paint colour and fixative according to instructions at one end, spread a little over a part of the bag and place your ‘print plate’ into the paint, press hard, and test on a clear part of the plastic. Several thumps may be needed to get good coverage. Now stamp your fabric! And repeat as often as you need to finish the job. Heat set either using an iron or place in oven as per fixative instructions. Cheers…..