Teacups with flowers are most of the tea cups I can get. It works well with my fantasy gardens.
This very delicate teacup has what I think are sweet peas, but I gave it a topiary garden.

I finished these up over the weekend and this morning. Enough for now.
Two woodsy ones-
and two fairy houses-
*okay- they are all in my Etsy shop now*
Now, onto the girls, who have been waiting very patiently.
So what are these “make-do” things anyway?
I first heard about a make-do when I got interested in doll-making and was immersed in learning everything I could about vintage and antique cloth dolls. The same people who were talking about the dolls, were interested in all kinds of historical needlearts. The definition I came away with was- a make-do is a pincushion made from a household object that is no longer functional for it’s original purpose- Like a sugar bowl without a lid, a damaged candle stick, a goblet stem with no bowl, or a chipped or cracked cup.
I have been making mine, which I call tiny worlds, in teacups, most of which come from the thrift store. I am also lucky enough to have friends who think of me before they throw out something that I might use- Lucky me! My tiny worlds are made on wool balls, covered with wool fabric and then most of the detail work is done with embroidery and wool felt. It is a wonderful way to use up little pieces and scraps around my studio. And it is so much fun to imagine who lives on the miniature landscape.
I didn’t start out with teacups though. My first make-do was made from a broken goblet. Excuse the photo please- that blog post was from my early blog days, more then 5 years ago! Here are some links to other ones I’ve made and also to a basic tutorial on how to make one for yourself. If you’d like to try your hand at a tiny world make-do, the pattern is available here in my Etsy shop.
I have finished 2 more tiny worlds so I now have 4 finished. I will be putting them into my etsy shop this afternoon.
the latest 2-
– some great photos of my house from Jen, when she came to the workshop.
– I got profiled over here– I love her very original approach. An art in itself.
– I am thinking about attending the NIADA conference again this year. Anybody else? I hadn’t thought about it, but the other day, I was fixing my website links page (it had disappeared for some mysterious reason) and clicked on the site. I haven’t been to the last 2 and now I am thinking it is time again.
I am going in too many directions these days. My head is full of studio fantasy thoughts, lists of everything that needs to happen in the studio room before it is ready for occupancy (file this in “trials of living in an old house”), dolls, how to do printmaking without a press and stay true to my work… not to mention spring and gardening thoughts… and that is just the top of the pile. So, I end up spending too much time on the computer instead of moving forward with anything!
I got a few done for the market. And more not quite done- housing futures…
A snowy hilltop.
That tiny snowman was fun to make. And here is the back-
I call this one Big Flowers- inspired by my amazing sunflower crop this year.
and the back-
This one, with a white house, sold.
I will be doing an Etsy update tomorrow (Tuesday 9/23) around 3 EST. I will list the 2 pincushions and 2 girl dolls. Also, some more magnet sets. Sorry, no tattoo men right now.
I wrote up this article for my doll club’s newsletter, so I thought I might as well put it up here too.


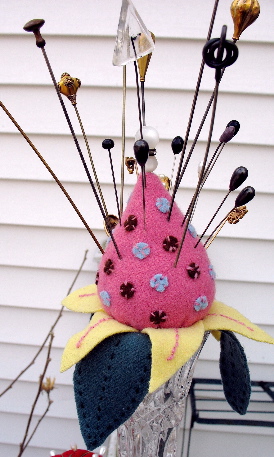
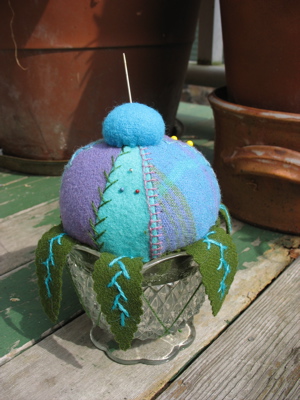
materials-
-cups, glasses, anything with an opening to put a pin cushion in or a shaft to put a pin cushion around.
-wool fabric
-embroidery threads
-wool for stuffing
I have had fun making pin cushions by recycling chipped and broken decorative glasses. I have used crystal and pressed glass, wine glasses, ice cream glasses and parfait glasses. I have been using ones that I found at my parents’ house when we were clearing out, and now I keep an eye out for anything special at Yard Sales.
The first one I made was inspired by my daughter. When we picked her up at the end of her first year at college, she handed me a broken wine glass – just a stem with some jagged glass of the bowl. She said to me “I kept it for you mom. I knew you’d want to do something with it!†She knows me so well!
My pin cushions have all been essentially the same- a fabric ball sitting in or on top of and enclosing part of the recycled object. I looked at other peoples’ work on the internet and this is the most common design. I have used wool fabrics for mine. I like wool for several reasons- firstly, I have a ton of it, secondly it has a nice “country†look, and thirdly it seems to hold up well to sticking pins in it all the time. I have not had such good luck when I have used tightly woven cottons, velvets or velveteen’s. The fabric seems to disintegrate sooner then I’d like.
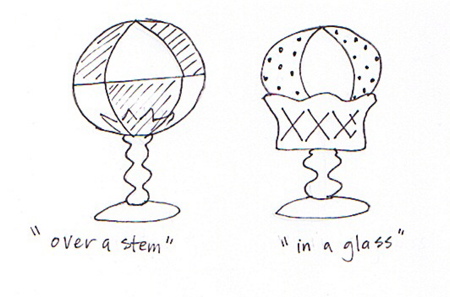
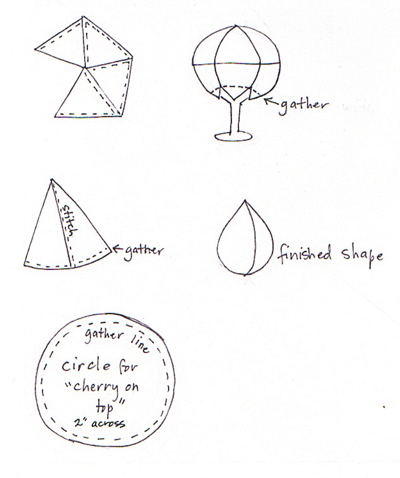
CAUTION- MATH AHEAD! Two easy shapes for making the pin cushions are triangles (or diamonds which are just 2 triangles put together) and a half circle which make a strawberry shape. You need to know the measurement for the circumference of the ball you will make. If you are making an “over a stem†pincushion, that measuement can be approximate. If you are making an “in a glass†make-do, you will need to measure the top edge of your glass.
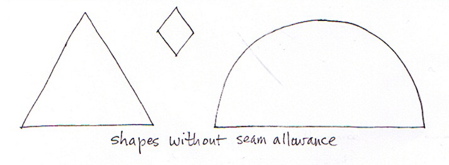
To figure out what size to cut your shapes- For Triangles- the pin cushion will be 4 triangles around. Divide your circumference measurement by 4. That measurement is the size of each of the 3 sides of your triangle. For strawberry- The circumference measurement is the length of the curved edge of the half circle. Don’t forget to add seam allowance to your pattern pieces.

Putting the pin cushion together-
for all pincushions- Sew up the seams. Stuff firmly. Decorate with embroidery or appliques if you’d like. I put some cut-out leaves around some of mine to make them look like flowers. I also stitch a small second pincushion on the top as a place to hold my needles. It looks like a cherry on top!
When I used the broken glass, I wrapped the broken top of the glass with some quilt batting so I would not cut myself and the sharp edges would not cut the fabric. When doing an “over a stem†make-do, you will have to leave the bottom open enough to fit in your base. The ball or strawbery is gather up around the base with strong (nylon) thread and tied as firmly as possible. You can put a ribbon or something to hide your stitches.
To attach the “in a glass†make-dos, I used Goop glue and pushed the pin cushion into the opening as firmly as possible. I then clamped it by using many rubber bands and string to hold everything in place until the glue
dried.
Update 7/09- this post has been getting a lot of traffic lately-Â Thanks for visiting! I have written up and am selling a pattern for a make-do pin cushion here on Etsy.